This bird design by Brian Walendziak is super cute! I’ve been trying to figure out other ways to use geo blossom balloons. This design uses a geo blossom balloon turned inside out.
I made a couple small changes – the back of the balloon is all purple. Instead of twisting a cluster of four white bubbles, I used a purple 260 for two bubbles and a white 260 for two bubbles (Brian suggests using four white bubbles to save time.) You also don’t need to twist a bubble to attach the beak. You can just wrap the knot around the balloon where you want to attach it. If you do twist a cluster of four white bubbles, you could make the bird have a face on both sides.
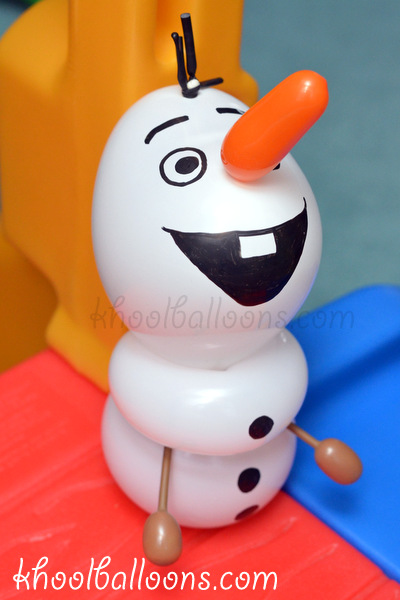
Here’s a snowman designed to look like Olaf, the snowman from the popular movie “Frozen.” I followed the video by Changsunny (with a couple small modifications.) I liked this one the best out of all of the other many balloon Olafs I’ve seen. It’s a simple design, but requires a few more advanced twists.
To make this balloon, you’ll use a 6″ white heart balloon for the head, a [small part of a] white 260 for the middle part of the body, and a round 5″ balloon for the bottom. Also, you’ll need the ends of two brown 160s for the stick arms, a small scrap orange 160 for the nose, and an uninflated scrap black balloon for the “hair.”
The one thing I did differently was the nose. I made it longer and used a different technique to attach the nose. In the video Changsunny uses tape, but with this technique you only use balloons. It’s a little more difficult, but if you have the time, then I think it’s worth it.
To attach the nose, turn the heart balloon inside out; then inflate the orange balloon while it’s inside the heart balloon and tie. Afterwards, inflate the heart balloon, but don’t pull the knot all the way through (you’ll be deflating it later on.) Figure out where you want to attach the nose to the heart, grab the knot from the nose, twist, and tie the nose to the heart with an uninflated balloon. Lastly, deflate the heart balloon, and turn it inside out again while pushing out the nose. This might be a little hard to understand – check out Patricia Bunnell’s dog design to see the photos for how she attaches the nose of the dog.
The one other thing I might do differently next time is use a larger round balloon for the bottom of the snowman to give it a slightly larger base. While trying to attach the bottom balloon, I actually popped the round balloon twice and had to put in less air when I tried again. A larger round balloon would be less likely to pop.
Speaking of princesses (continuing from my last post on Princess Mel)… all princesses need a wand!
Here I’ve made a simple wand that is probably ~2.5 feet long. It takes little time to make. I used one 260 balloon, one 160 balloon, and one heart balloon. Spiraling the balloons is quite easy, but looks really cool!
This balloon reminds of a birthday cake candle. I’d just need to replace the heart balloon with a yellow/orange flame. I guess if I ever make a really big cake or need a candle for some other reason, I can try something like this!
This balloon is for a super cool person, who also happens to be a football-playing princess. We will all miss you very much Mel! (At least you’re moving to a place not too far, and we’ll see you again soon!)
I’ve made a Princess Belle and Snow White before. The Princess Mel balloon is similar to Princess Belle, except for the head and hair. (You may want to view Unicaw89’s princess video.) For that I used two-three black 160s and a 5″ round (I bought a bag of blush 5″ round balloons for this very reason!) A raisin twist is used to help attach the hair. I watched JocelynBalloon’s excellent video to make the hair – it’s pretty cool how the hair is done.
Here’s a couple tortoises I made by following a video from Rob Driscoll of mydailyballoon.com. The video is quite easy-to-follow! Check out mydailyballoon.com, which has a ton of excellent balloons.
The larger tortoise is made using 260 balloons (as seen in the video); the smaller one I made using 160 balloons. The smaller one has five bubbles for the shell instead of four.
Smaller tortoise
BTW, do you know the differences between a tortoise and a turtle?
It’s Emmet from “The Lego Movie!” I made this one for an 8 year old birthday boy. I haven’t seen the movie myself yet, but I heard it’s pretty good!
To make this balloon, I used a large round balloon for the head, some brown 160s for the hair, an orange 350 and 260 for the body, an orange 350 for the legs, a blue 260 for the arms, and yellow 160 scraps for the hands.
I spent the most time trying to figure out the head/hair. I ended up using 4 raisins to help hold the hair. To try to make the round balloon less round and more flat at the top and bottom, there is an uninflated bottom pulling the top and the bottom of the balloon together. I used a raisin to attach the uninflated balloon to the top inside of the balloon.
A raisin twist is a method to attach a balloon to another balloon where there normally would be no place to attach a balloon. You do this by putting a raisin (a balloon knot) into the balloon, then grabbing the knot from the outside and twisting/tying a balloon around it. See this balloon forum for some pics.
To make this balloon, you’ll need some white balloons – part of a 160 (for the flower), part of a 350 (for the face), and two 260s (for the body), and either red of pink balloons depending on what color you want her to wear – part of a 160 (for the lower part of her hood), part of a 260 (for the part of the hood that goes around her head), and a 350 (for part of the the hood covering the ears and the back of the head). I also used a yellow scrap for the flower.
The video is in Spanish, but it is very easy to follow!
There are a number of birthdays coming up, so stay tuned for more balloons! (Happy Spring Birthdays!)
This minion is similar to the minion I made before, but this one is much larger. (First time I used a 646 balloon!) It is based on unicaw89′s design, with a few small modifications. I also gave it black gloves, and a flower and a heart balloon to hold.
Last week, when I was wrapping presents and couldn’t find any ribbon, I ended up using a 160 balloon to add this gift bow to a small boxed gift. It was pretty simple and turned out pretty well! I should try making larger gift bows sometime.
I made this cake for a Christmas party today. I wanted to make a cake larger than the one I usually make, and made this two-tiered six-sided cake.
Two-tier cake
To make this cake, I used fourteen white 260s, two green 260s for the top of the cake, six green 160s for the frosting to decorate, and a couple scraps for the candle. It was the first time I made a cake this size and took 2+ hours.
This past weekend, some friends and I went to watch the MIT men’s basketball game. It was a pretty exciting game – the first half was close, with MIT eventually pulling away from Rhode Island College. Go Engineers!
Beaver
We brought some kids to the game and I made this beaver (MIT’s mascot) beforehand for them. It is made from two 160 brown balloons (actually one plus a small scrap), and a few scraps for the teeth, eyes, and nose. The head is similar to Mr. Penguin‘s head, except with an additional couple of pinch twists in the front and in the back. The rest of the body is made similarly to this cow‘s body, with the addition of a beaver tail and extra bubbles for the back.
Happy Thanksgiving everyone!
I made three turkeys this week – the easier, inedible kind. 🙂 Took about 10+ minutes each after I figured it out. I saw a photo of another version of a balloon turkey online a while ago and wanted to try to make one sometime.
Turkey
To make this balloon, I used a 350 brown balloon, two 260 brown balloons, and part of a white 160 balloon. First, make the main body with the 350 balloon. Do a three bubble roll-through and then wrap/tie the fourth bubble in place. Second, use a 260 balloons to make a wing, slide it through the body, and then make the second wing on the other side. You’ll probably have some balloon left over – pop it or use scissors to remove it. Third, use the other 260 to make the legs. You’ll likely use the entire balloon for the legs. Lastly, add the bone to the legs using the white 160.
Congrats to the Boston Red Sox, 2013 World Series Champions!
We’ve had many long nights of exciting baseball. Thanks for a great season!
Here’s Wally the Green Monster, who I made while watching Game 6 last night. He’s composed of a mix of 350, 260, and 160 balloons.
Update:
We brought Wally to the Boston Red Sox Rolling Rally and saw all the Red Sox players on the Duck Boats! Wally got the attention of a number of kids and got some photos taken of him. (One toddler kept calling him Elmo!) What a fun event on a beautiful day! Wally at the Boston Red Sox Rolling Rally
I’ve made Elmo a few times before – a little differently each time. The head I usually make the same way. The body I make differently depending on how much time I have. Here I’ve used a 5-bubble body, and made the arms and legs separately. Or make the arms/legs using simple loop or link twists, and one bubble or a 3-bubble roll-through for the body.
Even if you haven’t seen the movie “Despicable Me yet,” you’ve probably seen these little yellow minion creatures around.
This minion balloon is based on unicaw89’s design. I made a few modifications and used smaller balloons – a 350 for the head, 260s for the arms and legs, and 160s for the overalls. I made the eye/goggles a little differently – I used a white 350 scrap and a black 260 scrap to make the eyeball, using something like a tulip twist/link. I wrapped an uninflated gray 350 around the eyeball, and tied an uninflated black 350 to the back of the eyeball for the band.
Next time, I’ll give the minion some black gloves.
This motorcycle balloon is based on Mr. Boma’s motorcycle, with a few minor modifications. To make this balloon, I used one black 260, one gray 260 along with a scrap, one yellow 260 along with a scrap, and part of a 160 black balloon for the handlebars. You’ll be using the pinch twist a lot for this balloon!
Motorcycle (side view)Guy with his motorcycle
I made a person (mini-version of my friend) to go with the motorcycle using 160 balloons. I used the same technique I would with 260 balloons. It’s a little harder to work with the balloon to make such small twists (especially for the head), but not too bad (though you may not be able to add as much detail as easily.)
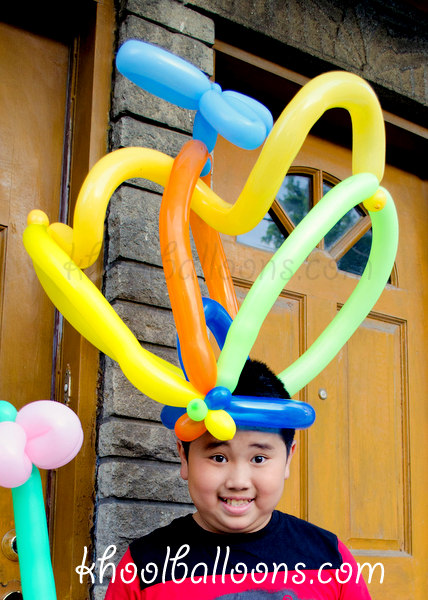
Older kids and adults love fun balloon hats! (Smaller kids, not so much – they usually prefer something they can hold.)
One way to begin, is to make the basic balloon helmet. After that, just be creative! Use lots of different colors. Add a propeller and/or a balloon curly! Hats can draw quite a lot of attention.
I’ve made many fish before. Now I’ve designed a simpler fish for some friends who are going on a mission trip and are interested in some balloon twisting. This design uses one 260 balloon and one small 5″ round balloon. It’s pretty fast and only requires 2-3 twists.
To get started, inflate the round balloon and the 260 balloon, leaving about 1″ uninflated. Next, tie the ends of the balloon together. Squeeze the 260 balloon to spread the air to inflate the rest of the balloon. Fold the 260 balloon in half. You can probably figure out the rest :).
Simple fish
If you’d like to add more detail/color, you can use another small round balloon twisted in half to add eyeballs. Fish with eyeballs
You can also add lips to the fish by doing two pinch twists. Fish with lips
Or, add both eyeballs and lips! Note: if you are adding lips, remember to leave an extra 1/2 inch of the balloon uninflated so that the balloon has room to expand for the two additional pinch twists. Fish with eyeballs and lips