We got to spend the weekend with our nephew and niece, and we put together this humungous heart for their parents’ anniversary! It was fun building the heart balloon together! Happy anniversary A&A! 🙂
I’ve made this one before, but this time we made it red with a pink border, which my niece picked. Check out the very talented Sue Bowler’s instructions for how to make this!
Introducing the newest poop emoji balloon – the poop wand! Everything it touches turns into magical poop! I’ve been making wands, scepters, and poop balloons, so I thought why not a poop wand? I added some ribbon for fun.
I think this one is a winner – I got some laughs out of it. But who doesn’t like poop?
Merry Christmas to my peeps from my poops! After making Halloween poop, I started thinking about poop emoji balloons for Christmas. Who knew I’d be making so many of these in 2020. 😀
Hope you all have a restful holiday break!
Christmas poop emoji with hollySnowman poop emojiChristmas tree poop emoji
Here’s another pumpkin; this time, pumpkin poop! Like the poop emoji, except the pumpkin version. 🙂
Whenever I make things like this, kids or people who are around kids recognize what it is supposed to be more easily than others.
Happy halloween! This giant pumpkin balloon was made for a Fall Harvest Party. Afterwards, I fixed the popped balloons and it sat in my living room for a week and was used as a pumpkin playhouse! I removed one balloon in the back so our playhouse could have a window.
Happy Birthday to my friend, Carmen! Now you’ve got two big hearts!
Check out Sue Bowler’s instructions for how to make this. It took me about 2 hours. You’ll use 79 Quick Links/Link-O-Loons and 78 5″ balloons. I inflated the balloons to 7″ and 9″, and the resulting heart was humongous (though I was still able to squeeze the balloon into our SUV for transport.)
Congratulations to my friend Pam on her graduation! I’m so excited for you and your future students!
This graduation owl is similar to the owl I twisted before, designed by TaylorAnnArt. I added a graduation cap to it, attached by twisting an extra pinch twist in the head and tying the cap to it with the other end of the balloon used to form the tassel.
For my grandma’s birthday party, my cousin and I put together this organic balloon arch, using tons of balloons and fishing line. I used uninflated balloons to attach the arch to the curtain rods. (If your wall is empty, you can get some small removable sticky hooks to attach to the wall.)
This was the first organic arch (or any arch) I’ve made. It was a lot of fun to do! One tip is to start with smaller balloons on one end and gradually get larger. Also, include a couple really large balloons.
I didn’t think to get a nice photo, but here’s one that was taken on a phone late at night after we finished. We were in a bit of a time crunch, but it worked out well. At the party, we took many photos with the balloons in the background. I’d love to make another one sometime!
A very special happy birthday to my grandma, whom I’m thankful to have in my life, and who defied doctor’s expectations about her health this year.
Hope everyone is enjoying the end of 2016. I am off from work and have had the chance to do a little more twisting – I plan to get a few more posts in this year. I made a couple of these cute Christmas penguins to put in some gift bags last week.
To make this balloon, you’ll need a black 260, a white 260, a red 260 (scrap), and orange and white 160 scraps. I followed Vyacheslav’s tutorial video. He also adds a Christmas tree and present to the penguin balloon. Penguins are a great balloon to make – they are popular birds, super cute, and a great way to use up any extra white and black balloons.
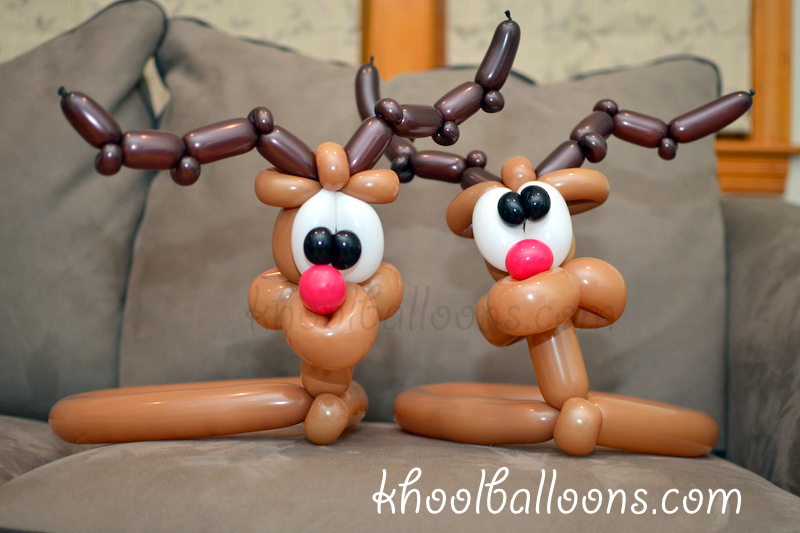
I made these two wearable reindeer balloons for the kids next door. It was so much fun watching them run around the house with these balloons, singing “Rudolph the red-nosed reindeer.” Boundless energy!
To make this balloon, you’ll need two brown 260s for the head and body, one dark brown 160 for the antlers, and several 260 scraps: white for the eyes, black for the eyeballs, and red for the nose. I made this based on Twister Sister’s tutorial, with a few changes: I used 260 balloons instead of 350 balloons and I also added some ears. You could easily turn this into a hat.
These baby bootees were hung as a wall decoration for a baby shower.
To make these balloons, I followed Vyacheslav’s video tutorial. (The video is in Russian, but can easily be followed. Check out his other tutorials!) I didn’t have pink small rounds and used two pink large rounds instead. This balloon requires a pretty neat advanced technique to get the shape of the shoes – you’ll inflate a 160 or 260 balloon segment inside of a round balloon and then deflate the round balloon a bit. Very cute!
Last week, when I was wrapping presents and couldn’t find any ribbon, I ended up using a 160 balloon to add this gift bow to a small boxed gift. It was pretty simple and turned out pretty well! I should try making larger gift bows sometime.
Happy Thanksgiving everyone!
I made three turkeys this week – the easier, inedible kind. 🙂 Took about 10+ minutes each after I figured it out. I saw a photo of another version of a balloon turkey online a while ago and wanted to try to make one sometime.
Turkey
To make this balloon, I used a 350 brown balloon, two 260 brown balloons, and part of a white 160 balloon. First, make the main body with the 350 balloon. Do a three bubble roll-through and then wrap/tie the fourth bubble in place. Second, use a 260 balloons to make a wing, slide it through the body, and then make the second wing on the other side. You’ll probably have some balloon left over – pop it or use scissors to remove it. Third, use the other 260 to make the legs. You’ll likely use the entire balloon for the legs. Lastly, add the bone to the legs using the white 160.
To make this balloon, I used 1 red balloon and 3.5 pink balloons. You of course could use all the same color or any combination of colors. You’ll basically start by twisting loops of bubbles, just the same way you would make a necklace. The red outline requires a 15 bubble loop; you’ll also need two 20-bubble loops, a 12-bubble loop, and two 6-bubble loops. I used one balloon to make both the 12-bubble and 6-bubble loops, and used half a balloon to make one of the 6-bubble loops.
Try to make all the bubbles the same size. The more consistent the size, the better. And make sure to twist each bubble a good number of times so it won’t come undone easily.
After you finish making the loops, you’ll make a couple more simple twists and then put all the chains together carefully to make the heart balloon. (Check out the video!) This balloon is pretty cool. It’s 3D and the back is the same as the front.
I’ve been meaning to make something Christmas-related, and finally made this tree! I didn’t want to make a very big tree, and so I used 160 balloons and not 260 balloons. This tree is about 8-10 inches tall.
To make this balloon, I used 3 green 160 balloons, a gold 160 balloon to decorate the tree, and some scrap 160 and 260 balloons for the ball ornaments.
I started by making a pinch twist, and then 3 small loop twists (connected at the same spot), followed by a small bubble and then another set of loop twists, followed by a small bubble and then another set of loop twists, and so on…, and ending with a small bubble at the bottom. The lower the level of branches, the more the loop twists, and the larger the loop twists. Whenever you’re about to run out of the green balloon, just pop the remaining balloon, tie a knot, and wrap it around the balloon; then attach another green balloon and start again where you left off. Lastly, I twisted a series of bubbles (using the gold 160), and used different colors of balloon scraps to make ball ornaments to decorate the tree.
It definitely feels like baby shower season! I made these pacifier balloons and hung them up as decorations for a baby shower. Pacifiers
To make this pacifier, you’ll need one 5″ round balloon and one 160 balloon.
Inflate the 160 balloon until there is a little bit less than 1″ uninflated.
Make one loop for the handle.
Push the air to fill up any remaining uninflated part of the balloon.
Make 3 loops for the mouth shield part of the pacifier, leaving a small bubble at the end. You can make the three loops with one twist by first folding the balloon so it has 3 loops (like a sine wave with 1.5 cycles – see picture… actually it’s more like 1.55) and twisting it in the middle (along the x-axis.)
Hide the remaining small bubble in the handle.
Then inflate the round balloon, tie it, and wrap the end around the 160 balloon to attach it.