I was stopping by a brunch at a friend’s place and thought I’d bring cupcakes. I love balloon food. 🙂
Cupcakes
This balloon is quick to make, but requires a more advanced twist tulip twist and a couple pinch twists. You’ll need a 5″ round, a 160 balloon for the frosting, and a ~4″ red scrap for the cherry. I saw these in a video tutorial by Scott Kazan. I have so many blush 5″ rounds, and am glad I found another way to use them!
Here’s my try at a simple one balloon bird. The bird design by Twistina is super cute, but I wanted a simpler bird.
The large bird to the right in the picture above is made with a single 260 balloon. You won’t need the entire balloon, and I wrapped a portion of the uninflated balloon around the body to hide it, before finishing off the balloon with the tail.
The two birds on the left are made with 160 balloons. As shown, you can easily add a different color for the beak and/or feet, if you are not in a rush. Using just a yellow/orange bubble for the beak will add a lot.
Happy happy birthday to my wonderful niece! Can’t believe it’s been 5 years already since I made you this princess balloon for your birthday.
For this bouquet, I added a heart and a Hello Kitty balloon. Different shapes are fun, and who doesn’t like Hello Kitty? Using such balloons also saves your fingers from having to twist additional flowers.
A couple of the flowers petals deflated by the next day. (That’s okay – you can’t really tell.) I’ll have to remember to let a little air out of the balloon before tying to help avoid popping/deflation.
To make this balloon, you’ll need a round white and a black 160 or 260. The one thing I do differently is I twist the tail out of the round white balloon (because a panda’s tail is actually white.) If you use the plain white rounds, you’ll need a black marker to draw the face. For the black balloon, I happened to have some Qualatex Pearl Onyx Black 160s, which I like better than the regular Onyx Black.
I gave a couple of these balloons to a two and a three year old. The balloons survived quite a bit of squeezing and pulling!
BTW, La’s Rocks is a popular balloon shop – I’ve heard great things about them. They offer free shipping if you order more than $150. They have a lot of variety – I may order from them next time.
This balloon hat was made for a special birthday boy, my super-energetic nephew. (Can’t believe you’re growing up so quickly!)
This hat has the same base as the five-sided birthday cake and this other hat. You can choose different colors and arrange the ends in various ways to create many unique and fun hats. It takes me about 15 minutes now.
This one-balloon dinosaur (T-Rex) by Rob Driscoll is another fun and fast balloon. You’ll need a black marker to give the dinosaur sharp, scary teeth and eyes.
Check out Rob’s blog – he’s quite a talented balloon artist and photographer, and has been doing a creative series of “Twisted Cinema” balloon posts.
This two-balloon horse is a fun and fast one! You can use different colors instead of the usual black/brown/white; “My Little Pony” fans will love them. It can also stand on its own.
Recently, I’ve been looking for more balloon designs that can be made quickly. I twisted for a classroom of kids last week, and whenever you have a large group of kids (and limited time), you’ll usually need to stick to designs that only require one or two balloons. My next few posts will be on simple balloons.
To make this balloon, I followed this tutorial video by Michael Floyd. If all you can make is the basic balloon dog, this one is not much harder. You’ll just need to learn how to make pinch twists, which you’ll see in the video. I like Michael’s explanation of how to make the poodle tail. It may take a little time to figure out the poodle tail, but if you can’t get it, you can just slowly push the air to the other side of the balloon.
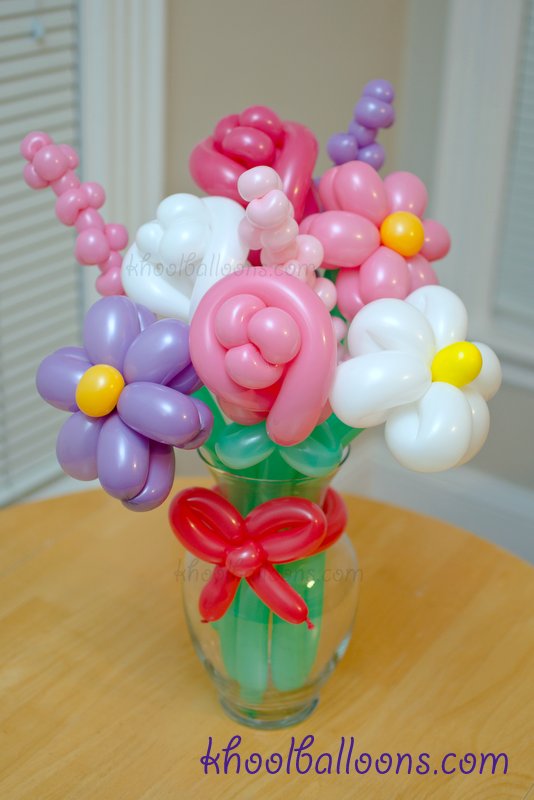
This flower bouquet was made for my friend’s baby shower. Congratulations Katie on your coming bundle of joy! 🙂
You can make a vase out of balloons, but I often like using a real glass vase. It looks nice and it is sturdy. For the stems, I like to use the wintergreen 160 balloons, which are part of the Qualatex 160 Vibrant Assortment. Of course, any green will work. Many of these flowers I’ve made before, but I did look up a tutorial for the rose. There are many rose videos out there – I used this video by Yonaimy. Lastly, you get to use your flower arranging skills. 🙂
To decorate one of the walls at a baby shower, I made three of the these flowers, one red (as shown), along with one pink flower and one white flower. The flower is almost a foot wide after being put together.
To make this balloon: the flower is made of five 6″ heart balloons for the petals, and a yellow balloon for the middle part. I used a part of a yellow 350 balloon (with two pinch twists), but you could also just use a small round yellow balloon (twisted in half). Inflate and tie three of the heart balloons together, and the other two heart balloons together, and then twist the two sets to connect them. Then slide the yellow balloon into place. The balloon will look the same on both sides. I tied a short piece of ribbon to the balloon and taped the other end to the wall.
I will try to put a video together about how to make this balloon. It’s pretty simple!
These baby bootees were hung as a wall decoration for a baby shower.
To make these balloons, I followed Vyacheslav’s video tutorial. (The video is in Russian, but can easily be followed. Check out his other tutorials!) I didn’t have pink small rounds and used two pink large rounds instead. This balloon requires a pretty neat advanced technique to get the shape of the shoes – you’ll inflate a 160 or 260 balloon segment inside of a round balloon and then deflate the round balloon a bit. Very cute!
2016 is the year of the monkey according to the Chinese zodiac. I twisted the above monkey for a baby shower this past weekend (more photos to come!)
This was the first time I used a geo blossom balloon as a base. I’ve read how other balloon artists have partially filled the geo blossom with water or other weights to keep the balloon upright. I didn’t fill the balloon with anything but air, and used Scotch tape on the bottom of the geo blossom, which worked well for me.
Cakes are high on the list of balloons I twist. (Who doesn’t like cake?) Here’s one I made for a Christmas party. I added a red stripe on the sides to make it a little more festive. Merry Christmas!
This balloon was made for a co-worker who is retiring. He was my first mentor at my first job out of college, and I have learned so much from him! Congrats Dave!
To make this balloon, I followed a video by Flash the Magician. My husband has some suggestions for changes, so I may try to modify the design some.
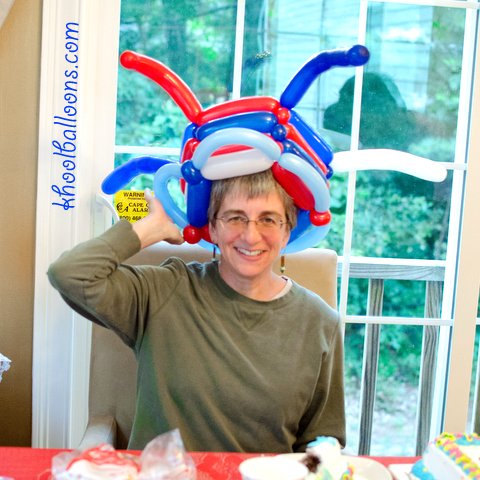
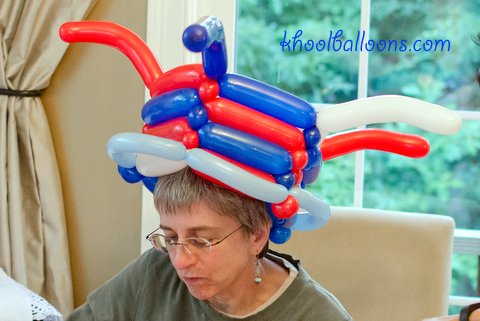
A very special happy July 4th birthday to my lovely and talented Aunt Jess! My aunt, uncle, and cousin visited and we got to celebrate in person. We had a great time vacationing in Cape Cod with family and friends.
Designed on the fly, this hat is five-sided and uses five 260 balloons. (You could make it with any number of sides three or greater, but I like five.) It uses a circular weaving pattern, the same one I use to make a birthday cake. I also added a brim with a 160 balloon. Afterwards, I bent the remaining balloon segments so that they curve downward.
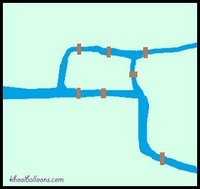
I came across this pretzel balloon while reviewing some of the fun and super cool creations by Sage the Balloon Sage. It’s an easy balloon to twist and only requires one balloon. Add “salt” with a white paint marker. I always get a kick out of serving balloon foods to guests. 🙂
Can you twist the above balloon using just one balloon? (Assume you can’t cut or pop the balloon into more than one segment.)
If you can figure out the above, you are solving a problem equivalent to what the mathematician Euler resolved in 1735, laying the foundations of graph theory!
Seven bridges of Königsberg
Some background: If you are familiar with graph theory, you may remember this as the “Seven Bridges of Königsberg” problem.
At the time, the city of Königsberg, Prussia had 7 bridges connecting its pieces of land that were separated by branches of the Pregel River. The question posed was whether you could walk through the city and cross all bridges, but cross each bridge exactly one time. Euler broke down this problem abstractly. In the below graph, the edges (lines) represent the bridges and the nodes (dots) represent the land the bridges connect.
Graph of the Seven BridgesBalloon graph
If you compare a graph of the seven bridges of Königsberg with a graph of the balloon (I’ve blogged about graphing balloons before), you’ll see that they are the same. And if you think about it a little more, you may see that asking whether you can cross all the bridges exactly once is the same as asking whether you can twist the above balloon using one balloon!
Pretty cool, huh?!
Balloon twisting has a lot to do with graph theory!
Pac-Man
Another similar question is asking if there’s any route Pac-Man could take to eat all the pac-dots without traversing any part of the maze more than once (assume Pac-Man can start at any point.) Can he?
(Take some time and try to figure it out now!)
The graph representation of this maze is the same as the graphs above. And the question is basically the same question asked before.
Same question, same answer.
(Don’t read below this if you don’t want to know the solution yet.)
Some graph theory basics: if a node (aka vertex) has an odd number of lines coming from it, it is an odd node. If a node has an even number of lines coming from it, it is an even node. Euler proved that if a graph has exactly two odd nodes, you will be able to cross each edge exactly once (there is a Eulerian path), but you have to start at one of the odd nodes and end at the other odd node. If the graph has ALL even nodes, you can cross each edge exactly once AND end at the same point you started (the graph has a Eulerian path AND Eulerian circuit.)
In the graph above, all four nodes are of odd degree, so this graph does not have a Eulerian path or Eulerian circuit. The answer is: you cannot cross all bridges exactly once. And you cannot twist the balloon with exactly one balloon. (You’ll need two balloon segments.) And, no, Pac-Man cannot eat all the pac-dots without traversing part of the maze more than once.
Now back to balloon twisting – I wonder how I can use the above balloon – heart? head of a mouse or koala bear? base of a spaceship? 🙂
(And for you history buffs, two of the seven bridges still exist in what was Königsberg, today Kaliningrad [Russia]. Two of the bridges were damaged by Allied bombing during WWII, a couple were demolished and replaced with a new highway, and one was rebuilt.)
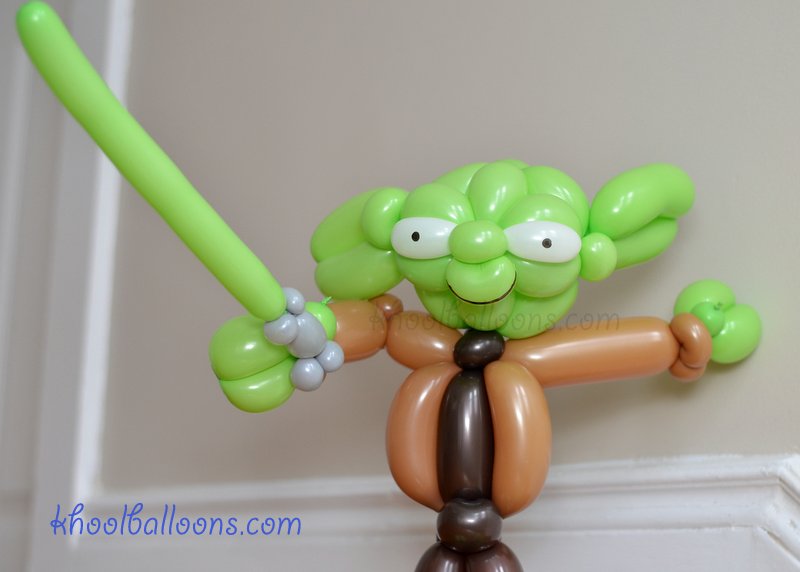
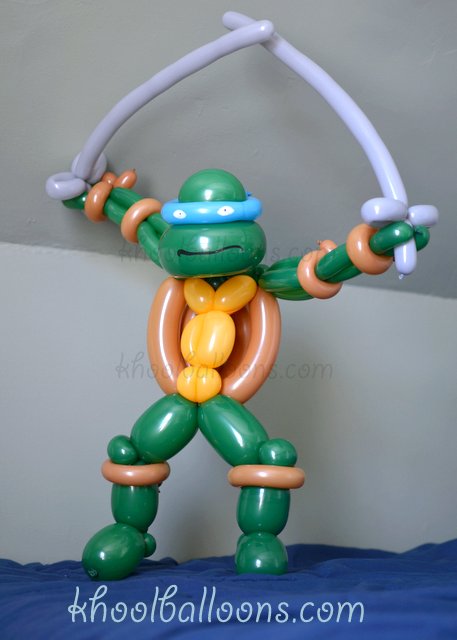
Happy Birthday to my super energetic and fun nephew! His favorite Ninja Turtle is Leonardo, the leader of the team!
I’ve made Donatello before, following instructions from balloonmodels.com. This time, I figured out a different design.
To make this balloon, I used a green 350 for the head (with the same design as before), a brown and a goldenrod 260s for the shell, green 160s for the arms, a green 350 for the legs, two gray 160s for the swords, and brown 160s for the arm bands and leg bands. I had meant to take a picture of the new design of the shell, but forgot! I finished the balloon by using a a white paint marker and black marker for the face.
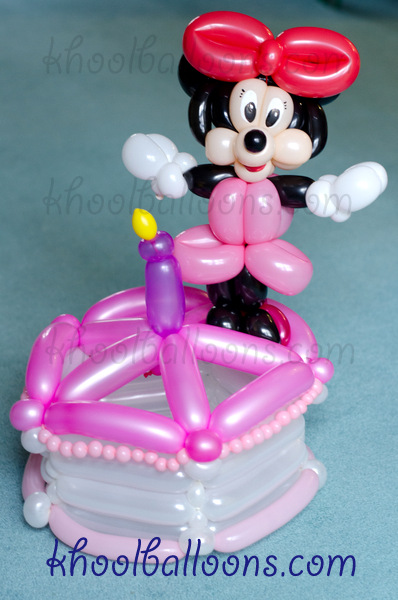
This birthday cake was made for a fun, energetic little girl who LOVES Minnie Mouse! Happy Birthday Kylen! 🙂 It was so great to celebrate with you! Can’t believe you’re growing up so quickly!
This balloon is a birthday cake balloon with a Minnie Mouse balloon on top (the feet are squeezed in.) I had thought about twisting Minnie Mouse permanently in on top of the cake, but this way, you can easily take Minnie off and just hold the Minnie Mouse balloon if you want.
The balloon cake uses the same pentagonal base design you see in most of my ballooncakes. Minnie Mouse is made based on this design by Syan. I need to work on the cheeks a bit so Minnie is less like a chipmunk. Not pictured here is a heart balloon that I attached to Minnie’s hand with “Happy Birthday!” written on it.