This minion is similar to the minion I made before, but this one is much larger. (First time I used a 646 balloon!) It is based on unicaw89′s design, with a few small modifications. I also gave it black gloves, and a flower and a heart balloon to hold.
I made this cake for a Christmas party today. I wanted to make a cake larger than the one I usually make, and made this two-tiered six-sided cake.
Two-tier cake
To make this cake, I used fourteen white 260s, two green 260s for the top of the cake, six green 160s for the frosting to decorate, and a couple scraps for the candle. It was the first time I made a cake this size and took 2+ hours.
Congrats to the Boston Red Sox, 2013 World Series Champions!
We’ve had many long nights of exciting baseball. Thanks for a great season!
Here’s Wally the Green Monster, who I made while watching Game 6 last night. He’s composed of a mix of 350, 260, and 160 balloons.
Update:
We brought Wally to the Boston Red Sox Rolling Rally and saw all the Red Sox players on the Duck Boats! Wally got the attention of a number of kids and got some photos taken of him. (One toddler kept calling him Elmo!) What a fun event on a beautiful day! Wally at the Boston Red Sox Rolling Rally
I’ve made Elmo a few times before – a little differently each time. The head I usually make the same way. The body I make differently depending on how much time I have. Here I’ve used a 5-bubble body, and made the arms and legs separately. Or make the arms/legs using simple loop or link twists, and one bubble or a 3-bubble roll-through for the body.
Even if you haven’t seen the movie “Despicable Me yet,” you’ve probably seen these little yellow minion creatures around.
This minion balloon is based on unicaw89’s design. I made a few modifications and used smaller balloons – a 350 for the head, 260s for the arms and legs, and 160s for the overalls. I made the eye/goggles a little differently – I used a white 350 scrap and a black 260 scrap to make the eyeball, using something like a tulip twist/link. I wrapped an uninflated gray 350 around the eyeball, and tied an uninflated black 350 to the back of the eyeball for the band.
Next time, I’ll give the minion some black gloves.
This motorcycle balloon is based on Mr. Boma’s motorcycle, with a few minor modifications. To make this balloon, I used one black 260, one gray 260 along with a scrap, one yellow 260 along with a scrap, and part of a 160 black balloon for the handlebars. You’ll be using the pinch twist a lot for this balloon!
Motorcycle (side view)Guy with his motorcycle
I made a person (mini-version of my friend) to go with the motorcycle using 160 balloons. I used the same technique I would with 260 balloons. It’s a little harder to work with the balloon to make such small twists (especially for the head), but not too bad (though you may not be able to add as much detail as easily.)
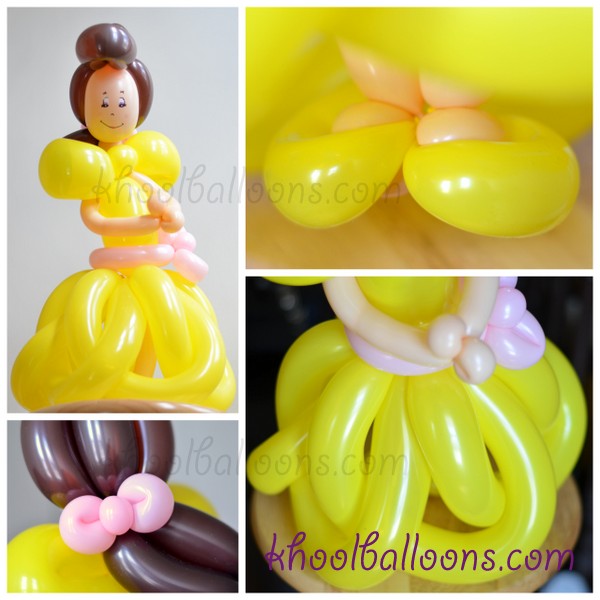
My niece is really into princesses, and so for her birthday this year, I made her a Princess Belle. Last time I made Snow White.
Princess Belle
I made this balloon based on unicaw89’s Princess video. He even includes a rose in a glass jar balloon, but I was running short on time.
To make this balloon, you’ll need 3 yellow 260s and scrap 350 for the dress, a blush 350 scrap for the head, a brown 260 for the hair, and a blush 160 (or 260) for the arms and legs. I added a pink sash and hair bow with a pink 160. I made the shoes/feet a little differently from what is seen in the video – I used a 160 yellow scrap for the shoes. The legs are not too much longer than the dress, and so this balloon is pretty stable and can stand on its own. The dress is made using a pretty neat flower weave, as you’ll see in the video.
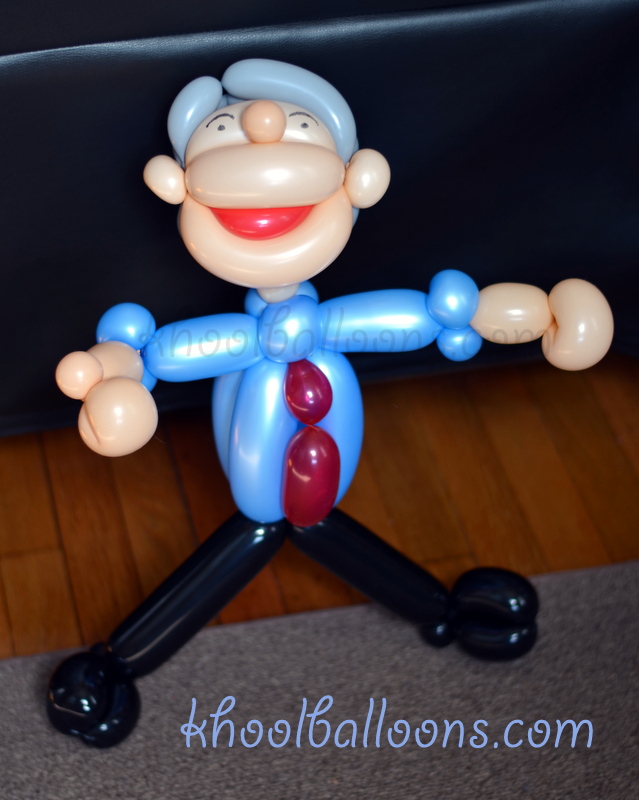
Congrats to one of my former teammates Al on his retirement! Al was one of the original people who built the very successful software product that I’ve been working on. I made this for his last day at work. Thanks for everything and best wishes!
The design of this balloon is similar to the balloon I made of my friend Christian, except that I drew in the eyes instead of using balloon eyes. I also made a 4-bubble body instead of a 3-bubble body. You might notice the tie is made with a 260 balloon instead of a 160 balloon. And I gave him a right hair part.
I made this balloon for a baby shower. (Congrats Tses!) Mickey Mouse was one of my favorite childhood characters – baby Mickey seemed appropriate for a baby shower!
To make this balloon, I used a blush 260 for the face, black 260 for the head/ears, blue 260 for the body/legs, and white 160 for the hands/arms. I also used a black marker and white paint pen to draw in the eyes, and a pink marker for a little pink on the cheeks.
I followed these instructions, which are actually in Japanese. You can use Google translate to see the page in English (it’s not a perfect translation, but you’ll get the idea.)
Here’s a fun food balloon. This balloon requires a few different neat techniques to make the cone itself and to attach the cherry to the ice cream. No glue was used. This is 100% balloon!
I got the idea for this balloon when I saw this ice cream cone balloon by Mishel Sabbah. However, I didn’t have any Geo Blossoms of the right color, so I made the “ice cream” part a little differently. Also, my version is smaller and I added a tulip twist to the cherry.
To make this balloon, I used five blush 160 balloons for the cone (you could also use goldenrod or brown), one white 160 and one 5″ round for the ice cream, and a small scrap of a red 160 for the cherry.
The cone is made the same way you’d make the base of the cake balloon, except you shorten the bubbles as you go to achieve the cone shape. You won’t use up the entire blush 160 balloon, and can use one of the resulting scraps to attach the cherry, and another scrap to put the entire balloon together.
I should explain how to attach the cherry in more detail in another post, but it basically requires inserting the (blown-up) cherry into the white round, tying it to the white round, pushing the cherry out of the round balloon (turning it inside-out), and then inflating the round balloon.
If you like sprinkles, you can draw some “sprinkles” with some colorful markers.
Here’s Hello Kitty again! (See my Hello Kitty last post.) This time, I made her limbs a little shorter and gave her a flower.
Hello Kitty’s real name is actually Kitty White, and she was born in 1975 in the suburbs of London. Did you know she also has a twin sister named Mimmy, who wears her bow on the other side? Or that Hello Kitty is worth 5 billion dollars a year (as of 2010)?
This balloon isn’t too hard to make, but it requires a lot of knot tying (and more knots take more time.) I counted nine knots, plus two knots for the flower, plus a raisin twist. (Because you don’t use the entire balloon, you have to detach/cut off the unused portion of the balloon and tie a knot.) There are a few pinch twists as well, which may be a little more difficult for newer twisters. But it’s a fun one to make!
Boston is a wonderful city with great people. It’s also quite a transient city, with people coming and going for educational and professional opportunities. Now, it’s time again to bid farewell to one of our friends. Good luck and best wishes to you in your new job and all future endeavors, Christian! Boston will miss you – be sure to visit!
As you can see, the balloon person is dressed business casual with a blue shirt, gray tie, and black dress pants. Someone suggested to give the balloon person large biceps, as Christian’s pretty buff. 🙂 (BTW, can anyone guess what restaurant we’re in front of?)
Happy Birthday Adam! Adam’s a car guy (he knows so much!), so a car was perfect for him.
To make the car, I used three full 260 blue balloons to make the car frame, two black 350 balloons and part of one 160 silver balloon to make the wheels, and the remaining part of the silver 160 and one blue 260 scrap to make the spoiler.
First, I made the body of the car. (I used these instructions from Michael Floyd to help make the base of the car.) Then I made the wheels using the tulip twist (similar to how I made these donuts) and then attached them. The wheels are a little tricky to twist (mostly because the knot is a little hard to tie) but I thought they looked pretty cool and were worth the effort. (The other option is a simple loop twist.) I tried to give it some chrome hubcaps/rims. Lastly, I added a spoiler to make the car look more like a sports car. If I had more time, I would have made two people to put into the car!
More penguins! I like penguins, and I also have a plethora of black balloons, so I made more penguins. 🙂
To make this balloon, you’ll need one black 260, one orange 160, and one scrap white 260. This penguin balloon is a slightly modified version of the birds I made before (based on Twistina’s design). You can inflate the black balloon leaving about 3 inches uninflated. You’ll make one less bubble for the body, and will add the white balloon in the front. For the penguin on the right, I also added an extra twist where I attached the beak.
Don’t be surprised if you see more penguin balloons in a future post!
Happy Birthday Matt! I was trying to think of a popular cartoon character from my childhood to make and thought of the Teenage Mutant Ninja Turtles! I watched this cartoon every Saturday morning, as well as played the video games.
To make this balloon, check out this balloonmodels.com blog post for step-by-step instructions. I mostly followed the instructions, but not exactly. I used one 260 green for the legs, one 260 green for the arms, part of a 260 green for the head, a purple 160 scrap for the mask, part of a yellow (golden rod) 260 for the chest, a brown 260 for the shell, and a brown 160 for the staff. If I make this one again, I’ll change the design slightly.
This balloon was made for a very good friend of mine for her bridal shower. 🙂
This one is similar to the princess balloon I made before, except the dress is slightly different and I added a necklace. I’m all out of white 260 balloons, so I used a 160 and a 350 white balloons instead. The hardest part for me is probably drawing the face (I can’t erase! I should get some new thin markers too.) I need to come up with some new hairdos – people keep telling me the hairdo makes them think of Olive Oil.
Congratulations to the soon-to-be-wedded Katie (and Eric!)
For my friend’s birthday, I made a balloon version of her. I made this one up as I went along, and used a number of colors, which takes a little more time. (You need to blow up/tie each balloon segment.)
This balloon has 15 balloon segments:
Head: One blush 350 balloon segment is used for the face and ears.
Nose: One blush 160 balloon bubble.
Hair: One black 350 balloon segment and two black 160 balloons. Wrap the ends around the ears to attach.
Neck: One blush balloon segment. Wrap the end around the pinch twists of the shirt to attach. The other end is squeezed in between the hair and face balloons.
Shirt: Two red 260 balloon segments. One segment is used to make the sleeves, basically just two pinch twists at each end. The second is used for the rest of the shirt, and twisted with first balloon with two pinch twists at the top, where you will attach the neck.
Arms: Two blush 160 balloon segments, one for each arm.
Shorts: One blue 160 balloon segment. Each side of the shorts is basically a three-body roll-through with two pinch twists at each end, where you will attach the legs.
Legs/feet: Two blush 260 balloon segments, one for each side.
Shoes: Two brown 160 balloon segments, one for each side.
The above penguin and cake were made for a special birthday boy whose party I attended. (So many spring birthdays!) I’ve blogged about each of these balloons before (penguin, cake), but thought I’d show this picture as the colors are a bit different. One day, I may get to posting instructions for the penguin balloon, if enough people are interested. (Everyone seems to love penguins!)
Happy birthday G! I made a princess that somewhat resembles Snow White (G’s favorite princess). And what’s a birthday without birthday cake?
Princess (side)
Princess: To make the princess, I used this video to help me get started. For the head, I used a black 260 for the hair and a blush 350 for the head. For the body, I improvised and made a slightly more detailed dress. I used a blush 160 for the arms, a 260 shiny blue for the top of dress, and 350 and 160 yellows for the bottom of the dress. If you only have 260 balloons, that is fine. I just like to use different sizes so everything is more in proportion. You may not be able to tell from the picture above, but both the bottom and top of the dress (and the hair) use a bird body (or three-bubble roll through.) I used a red 260 scrap to make a small hair bow, and a white paint pen and different colored markers to draw in the facial features.
Birthday cake: For the birthday cake, I followed this video to make the base of the cake. I made my cake 5-sided instead of 6-sided. After making the base, I “decorated” the cake using 160 pink balloons. The candle is a pretty neat twist. The candle is basically made by using a tulip twist, which can be a little difficult the first time (it might pop when you take your finger out of the balloon.) You can wear this birthday cake as a hat too!


")


