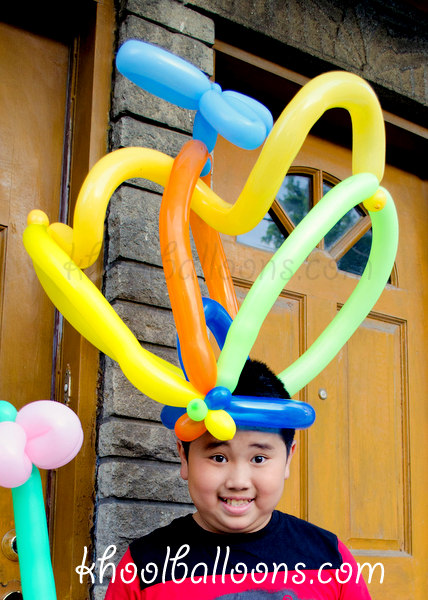
Older kids and adults love fun balloon hats! (Smaller kids, not so much – they usually prefer something they can hold.)
One way to begin, is to make the basic balloon helmet. After that, just be creative! Use lots of different colors. Add a propeller and/or a balloon curly! Hats can draw quite a lot of attention.
I’ve made many fish before. Now I’ve designed a simpler fish for some friends who are going on a mission trip and are interested in some balloon twisting. This design uses one 260 balloon and one small 5″ round balloon. It’s pretty fast and only requires 2-3 twists.
To get started, inflate the round balloon and the 260 balloon, leaving about 1″ uninflated. Next, tie the ends of the balloon together. Squeeze the 260 balloon to spread the air to inflate the rest of the balloon. Fold the 260 balloon in half. You can probably figure out the rest :).
Simple fish
If you’d like to add more detail/color, you can use another small round balloon twisted in half to add eyeballs. Fish with eyeballs
You can also add lips to the fish by doing two pinch twists. Fish with lips
Or, add both eyeballs and lips! Note: if you are adding lips, remember to leave an extra 1/2 inch of the balloon uninflated so that the balloon has room to expand for the two additional pinch twists. Fish with eyeballs and lips
This monkey is a great one to add to your arsenal – it only requires one balloon and is a fast one to make (and cute!) I’ve blogged about another monkey I’ve made before, but that one requires multiple balloons and is a little more complicated. If you have a lot of kids to twist for, you’ll want to make one can be made quickly.
I first saw this one-balloon monkey on Michael Floyd’s web site, where he has posted a very nice video on how to make the balloon. Check it out!
One-balloon monkey (side view)
Here’s a monkey I made out of a 160 balloon. To make this balloon, I inflated the balloon a little more than halfway.
Because the balloon is thinner and the monkey is smaller, there was plenty of balloon to give the monkey a three-balloon body, some small feet, and a long tail.
Here’s a balloon ball. Sure, you could just inflate a round balloon, but this is cooler. 🙂
Balloon ball – icosahedron
In mathematical terms, it’s actually an icosahedron – a polyhedron with 20 triangular sides. It may look complicated, but because of its symmetry and basic units, it’s actually quite easy to put together. I first saw this on Vi Hart’s web site, where she has posted great instructions for this icosahedron, as well as many other mathematical shapes, such as fractals, tangles, and other polyhedra! Check it out!
To make this balloon, I took three 160 balloons and cut each in half. Each section was then used to make one of the six units. (I wanted to make an icosahedron that wasn’t too big.)
I have a whole bag of Geo Blossom balloons and have yet figure out what to do with them. The most common and obvious thing to make with Geo Blossom balloons is a flower, and so I made this simple flower. It looks the same on both sides.
To make this balloon, I used one Geo Blossom, one small white round, and one green 260. With the white round balloon, first make a small bubble, tie a knot as far in in as possible, thread it through the Geo Blossom, and then make a second bubble on the other side of the Geo Blossom. Then, tie a knot and wrap it around the center of the balloon (like a pinch twist) to hide the knot. Afterwards, inflate the Geo Blossom, and use the green 260 to make the stem and leaves of the flower.
Here’s another easy hat to make, modeled by another one of my stuffed animals. (Stuffed animals are really good at sitting still for any length of time.) To make this hat, you’ll need one 260 balloon and one scrap 260 balloon. You start by making the basic helmet out of one balloon. Then, with the scrap balloon, make the propellers (similar to the rotors for a helicopter) and twist it to top of the hat. You can hide the knot by twisting it so it’s on the inside. (In the above pictures it isn’t hidden, but in the below two pictures it is.)
I made a hat for my stuffed animal! Ok, it’s almost a little too cute for me, but my teddy bear seemed like a good-sized model for the hat.
Really fun hats can be made easily with just a few twists, and you’ll usually use at least two or balloons for a hat. From my experience, I found that older kids like them, but some younger kids not so much. Younger kids (preschool age) would rather have something they can just hold.
To make this:
I used segments of 160 balloon scraps to make the above hat, which is a mini-size version of a hat you’d make for a person. To make this hat for a real person to wear, you’ll need four 260 balloons, preferably different colors. Start by making the helmet. (The helmet is pink in the photo.) Wrap the balloon around the person’s head to make sure it’ll fit. Then blow up 3 (or more) balloons, leaving a little less than an inch uninflated, and attach them to the ends of the helmet. Pretty simple, huh? You only really need 4 twists to make this hat!
Someone recently asked me about making a teddy bear, and here’s a one-balloon version. I followed these directions from balloondesigns.net (UPDATE: no longer exists.) The purple teddy bear is what you’ll end up with if you follow the instructions above exactly.
Tips: You’ll want to leave almost a 5″ tail when pumping the balloon. When twisting the series of seven bubbles to form the head, twist the 4th and 6th bubbles a little smaller than the others, so that the ears will not be so large. You can draw two different faces – one on each side!
The pink teddy bear is another version. This one has a neck, a tail, and uses only one balloon for the body. I left about a 4″ tail to make this one.
I’ve just returned from a short trip. Although I have been away, I twisted a number of balloons – for my cousins and family, including a birthday cake for my Grandma!
I made a car for my cousin, and turned some of the wheels that I didn’t use into donuts. They are made using a simple tulip twist and secured with a knot at the end.
Introducing a new line of vacuum cleaners…pocket-sized, colorful, and stylish! Vacuum Cleaners
I saw instructions for a vacuum cleaner in Marvin Hardy’s Advanced 260 Balloon Magic book and it made me chuckle. (I don’t think any kids will ever ask me to make a vacuum cleaner!)
Vacuum cleaners
The blue one is the original design by Marvin Hardy. It is made using one blue 260 and one inflated balloon for the electrical cord. I made a couple other variations, using a different color balloon for the vaccuum cleaner bag and an uninflated piece of balloon for the handle. The two smaller ones were made using 160 balloons. I’ll post a graph description of my design sometime soon.
If only this balloon really worked – my room could use a good vacuuming!
This hummingbird has a very similar design to the butterfly. I saw this design in Marvin Hardy’s Advanced 260 Balloon Magic book.
The hummingbird is easier to make than the butterfly. There is one less twist for the wings. You’ll leave a couple inches of uninflated balloon for the beak.
In the picture is a blue hummingbird made with a 260 balloon and a second smaller pink one made using half of a 160 balloon.
It definitely feels like baby shower season! I made these pacifier balloons and hung them up as decorations for a baby shower. Pacifiers
To make this pacifier, you’ll need one 5″ round balloon and one 160 balloon.
Inflate the 160 balloon until there is a little bit less than 1″ uninflated.
Make one loop for the handle.
Push the air to fill up any remaining uninflated part of the balloon.
Make 3 loops for the mouth shield part of the pacifier, leaving a small bubble at the end. You can make the three loops with one twist by first folding the balloon so it has 3 loops (like a sine wave with 1.5 cycles – see picture… actually it’s more like 1.55) and twisting it in the middle (along the x-axis.)
Hide the remaining small bubble in the handle.
Then inflate the round balloon, tie it, and wrap the end around the 160 balloon to attach it.
Here’s a mommy turtle with two little baby turtle hatchlings. I’m currently running low on green 260 balloons, so I used a 350 to make the shell using a three-bubble roll through, and a 160 for the flippers and feet. This design is based on another design I saw a few years ago (the owner has taken that youtube video down since then.)
Here’s my version of a simple elephant balloon animal. I’ve seen other simple one-balloon elephants, but in this design I use a second 160 balloon so that the trunk is more in proportion compared to the rest of the body.
This design requires two balloons: one full 260 balloon and a 160 scrap for the trunk.
Inflate the balloon leaving about four inches uninflated. Make a loop twist for the ear, a pinch twist for the head, and another loop twist for the other ear. Then make the rest of the body the way you would for a dog.
For the trunk, inflate the 160 balloon to however long you want the trunk to be, then tie off both ends (and cut off any remaining balloon if necessary.) Wrap one end around the head/ears to attach it to the rest of the elephant. Twist a small pinch twist for the mouth and position the trunk so that it is between the mouth and the head. (You can wrap the trunk around the head again if you’d like.)
This is basically made from two balloons twisted together, each containing a bouncy ball. I’d call it modern art, but give it to a child, and (after staring at it curiously) it becomes a toy! I got the idea of putting a ball inside a balloon from browsing balloonhq.com, which contains a tremendous amount of helpful information.
How do you get the ball into the balloon? In a future post, I’ll show you a little tool I made with a few items from around the house that you can use to put things into a balloon.
Khool Dog
So you’ve got the basic dog balloon down. How can you make it a bit more fancy? “Khool dog” here offers three quick ideas.
Make the balloon animal bigger. I used a 350 instead of the usual 260 balloon. A 350 balloon is three inches wide and 50 inches long, whereas a 260 balloon is two inches wide and 60 inches long. You’ll have to adjust the amount of air that you pump into the balloon. Some animals that usually require the entire 260 balloon may not work as well with the 350 balloon.
Add eyes. I used a small 5″ white round balloon twisted in half to make the eyes.
Add a bow tie. With a small 160 scrap, I made a bow tie and added it around the neck. You could also attach it to the ear using a raisin twist, but that will take a little more time.
Last Saturday my church hosted a Children’s Christmas party. It was a lot of fun, with crafts, gifts, and also Koko the clown, who entertained the guests with magic tricks, juggling, balloons, and shared about the meaning of Christmas. At the end, we also gave each kid a balloon animal, with which I helped out.
Because we were expecting possibly 100 kids, I tried to think of simpler balloon animals. We gave out red flowers, camels (which the wise men rode), and sheep (who were present in the stable where baby Jesus slept.) I was out of green 260 balloons, so I cut the red (for the petals) and green (for the stem) 160 balloons into halves to make two smaller flowers.
Camel
Camel: The camel balloon was a pretty simple animal to make. I went with a one-balloon design based on this camel youtube video. I simplified the design a bit – I didn’t do the tulip twist, and because I wanted the knot to be at the tail and not on the head, I started by making the tail first (instead of the head.) You’ll want to leave a little bit less than a 4 inch tail when inflating the balloon. I like to use up the entire balloon, and it may take you a try or two to get the size of the legs and body of the camel just right so that you have just the right amount left for the neck and head. After you are done twisting, bend the neck of the camel upwards, and bend the head downwards.
Sheep
Sheep: The sheep is a little more complex than the camel, as it uses two balloons and requires more knot tying. I followed these instructions from Professor Wonder to make this balloon. I also simplified this balloon in that I didn’t use the tulip (apple) twist to attach the two balloons. Instead I just tied the ends together. (I’m not too good with the tulip twist and often end up popping the balloon.) In addition to white sheep, I also made a few that were blue, pink or purple, and used either black and blush for the head. (The kids preferred blush over black.) I try to use up the entire balloon here as well, so I don’t have do any additional cutting or tying.
This parrot (sitting on a perch) is one of my favorite one-balloon animals to make. It is fast (faster than the dog!) and easy – only requiring about 4 twists, and looks very much like a parrot. If the outside loop (perch) is too small, you can have a kid wear it so that it looks like the parrot is sitting on the kid’s arm/shoulder. Just twist the balloon so that the bird is not in the circle and have a kid put his or her arm through the loop (with the bird sitting on top.)
I twisted some simple balloons (heart wands, flower hats, and four-legged creatures) for two special birthday girls at IHOP after our softball game one night. I used to think balloons were just for little kids, but I’m starting to see adults can enjoy them too (to my surprise!) This past summer while visiting family, I twisted some balloons for my little cousins, and I think my grandpa enjoyed them just as much. 🙂
(D commented that my friends aren’t really adults, but I disagree!)
The basic dog is a great balloon to start with if you’re new to twisting.. It is also just a great balloon to start with in general (an easy warm up.)
The basic dog is made up of ten bubbles – one for the head, two ears, neck, 2 front legs, body, 2 back legs, and a small bubble at the end to keep the back legs in place. And it only requires three lock twists – one for the ears, one for front legs, and one for the back legs.
The great thing about the basic dog is once you have it down, you can easily make variations – point the ears down to make a basset hound or make a long body for Dachshund, etc. If you make one with a really long neck and small ears, it’s a giraffe! Make a really small one with a long tail and it’s a mouse! Many other four-legged animals have the basic structure of the dog but just have slightly different legs, tail, or ears… Adjust the amount of air you pump into the balloon for a longer/shorter body.
Another great thing about the dog is that it is one of the most requested items from kids!


")
")


